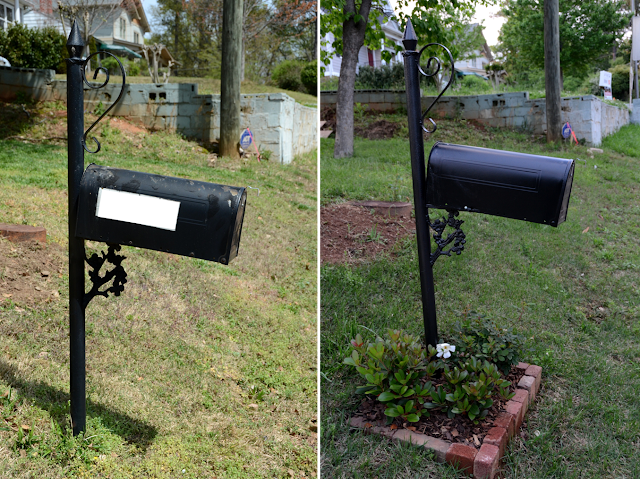
Mailbox Makeover
When you buy a fixer upper there are always things on your to do list and inevitably there are projects that stay on that list way longer than intended!
For us one of our biggest eye sores has been our mailbox.
It's funny how you can see something every day and choose to completely ignore it.
Well no more of that! In one afternoon we gave our little old mailbox a face lift, so quick and painless I'm not sure why we put it off for so long.

.png)

.png)
Originally we planned on a wooden post, but after living with the original wrought iron I couldn't bring myself to get rid of it (weird sentiment, I know). And in order to save a little extra dough we decided to first try to revamp our mailbox, rather than throw it away.
First we removed the mailbox, and used a simple solution of water and dish detergent to clean the post. A wire brush was used to remove as much rust as possible.
.jpg)
.jpg)
Once our post was clean and dry we laid out paper bags
Next was the mailbox. Another good cleaning with soap and water.
Then goo-be-gone and a wire brush were used to remove the sticky numbers.
The mailbox was then spray painted a medium shiny black.
Once the post was dry, we used an edger to make a square around our mailbox
and a shovel to remove excess dirt.
Because our mailbox is on a small incline, we placed reclaimed bricks
on three sides to create a border.
We ran to our local Lowes and picked out two bushes and one rose bush.
Top soil followed by mulch was added.
And in one afternoon our mailbox makeover was finished.
What projects have you put off for too long?
You know we LOVE comments!


.jpg)
.jpg)
.jpg)
.jpg)
.jpg)
.jpg)
.jpg)
.jpg)
.jpg)
.jpg)
.jpg)
.jpg)
.jpg)
.jpg)
.jpg)
This is really a nice and informative, containing all information and also has a great impact on the new technology. Thanks for sharing it custom hand painted mailbox
ReplyDeleteWow, a lot of hard work went into this box. Does it still look nice all these years later? Check out our Mailbox protection
ReplyDelete